- How To Set Up Company Information
- How to Customize Your Dashboard
- How To Set Up Sales Form Content
- How To Customize Invoices, Sales Receipts & Estimates
- How To Set Up Products and Services
- How To Set Up Messages
- How To Set Up Customer Statements
- How To Customize Expenses
- How To Set Up Advanced Settings
- How To Set Up Multiple Users
- How To Set Up the Chart of Accounts
- How To Set Up the Products and Services List
- How To Set Up Customers
- How To Set Up Vendors
- How To Create Quotes, Bids, and Estimates
- How To Create and Send Invoices
- How To Receive Payments
- How To Create & Send Sales Receipts
- How to Enter Partial Payments
- How to Track Billable Hours
- How To Write & Print Checks
- How To Enter Bills
- How To Pay Bills
- How To Make Expenses Billable
- How To Write off a Bad Debt
- How To Import Bank Transactions
- How To Enter Banking Transactions Manually
- How To Manage Downloaded Banking Transactions
- How To Record Bank Deposits
- How To Use the Undeposited Funds Account
- How To Transfer Funds Between Bank Accounts
- How To Record Bounced Checks From Customers
- How To Process Bank Reconciliations
- How To Import Credit Card Transactions
- How To Manage Downloaded Business Credit Card Transactions
- How To Enter a Credit Card Refund
- How To Reconcile Business Credit Card Accounts
- How To Process Credit Card Sales With QuickBooks Payments
- How To Record Credit Card Sales With a Third-party Credit Card Processor
- How To Process Payroll
- How To Set Up & Pay Payroll Tax
- How To Add Historical Payroll Data
- How To Set Up QuickBooks Payroll Direct Deposits
- How To Print Payroll Checks
- How To Run Payroll Reports
- How To Reconcile Payroll Liabilities
- How To Run a Profit and Loss Statement
- How To Create a Balance Sheet Report
- How To Run a Statement of Cash Flows
- How To Run an A/R Aging Report
- How To Run an A/P Aging Report
- How To Make a Journal Entry
- How To Use Classes and Locations
- How To Create Recurring Transactions
- How to Create and Manage Projects
We’ll cover how to customize invoices in QuickBooks Online using the new invoicing layout. This involves navigating to the invoicing form, personalizing basic information like company name and logo, and applying advanced customization options, such as the design, payment options, and frequency. You’ll also learn how to personalize your email content before sending the invoice to your customer.
Featured PartnerBILL has paid for this placement. However, our team of experts approved BILL as an appropriate product and our content remains editorially independent.
Whether you're focused on paying invoices, allocating budgets, or managing employee spend, BILL simplifies the entire process. And, of course, it integrates with QuickBooks.
- Automate accounts payable
- Maximize cash flow with spend control
- Gain visibility over your budgets
- Get paid 2x faster
Step 1: Navigate to the Invoicing Form
Click + New in the upper left corner of your dashboard and then select Invoice, as shown below.
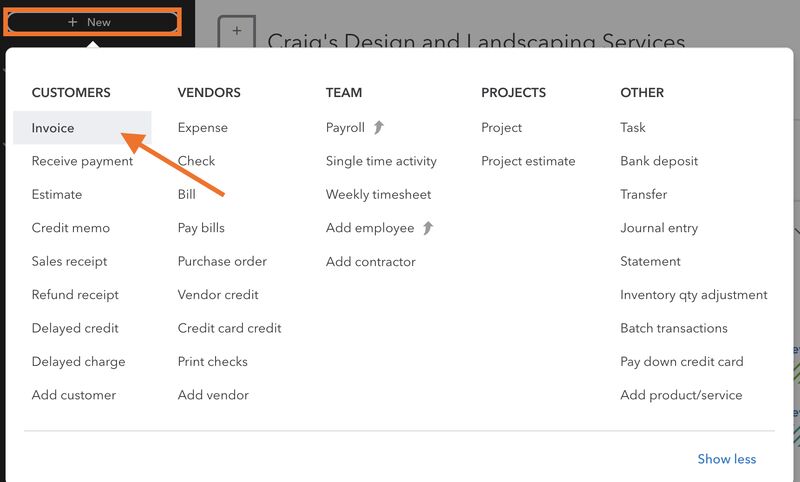
Click on “+ New” to navigate to the invoicing form
Since our last update: As mentioned earlier, QuickBooks Online now uses a new invoicing layout that allows you to customize your invoices on the spot. As of this writing, users can switch between the old and new layout, but we encourage learning the new one as it will eventually be the only option for all users.
You should now be using the new invoice layout; otherwise, you will see an Update layout option on the top of the invoicing form. Click on it to switch to the new layout. QuickBooks will then display the new invoicing form, as shown below.
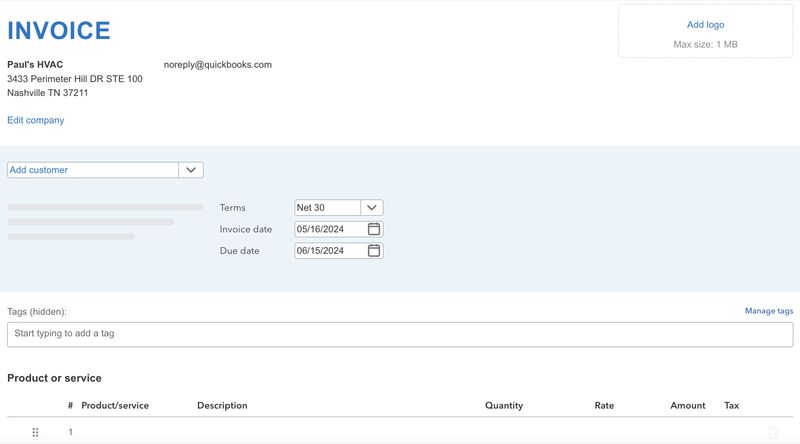
QuickBooks Online new invoicing form
Now, proceed to create your invoice by providing the required information in the invoicing form. This is explained in detail in our tutorial on creating and sending invoices in QuickBooks Online.
Step 2: Personalize Basic Information
When creating your invoice, you can personalize basic information, including your company details and logo. If you need to make changes to your company information, simply click on the Edit company option at the upper right hand of the invoicing form and make changes accordingly.
To make your invoice look more professional, you may upload your company logo. Click anywhere on the Add logo box, then upload your logo.
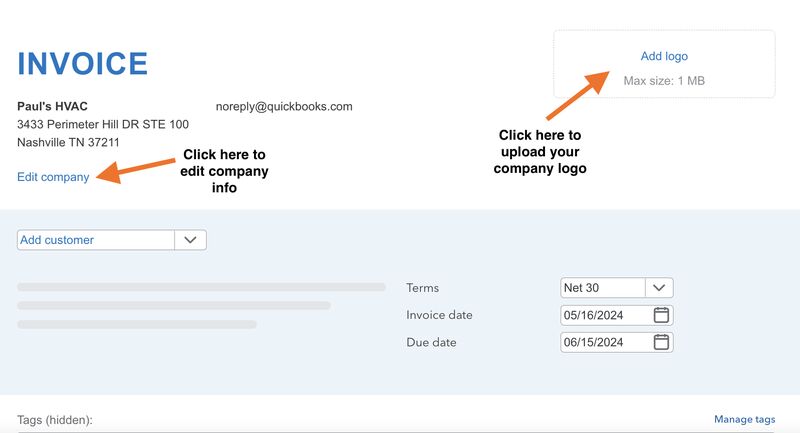
Edit company information and upload company logo to an invoice in QuickBooks.
Step 3: Customize Your Invoice Further
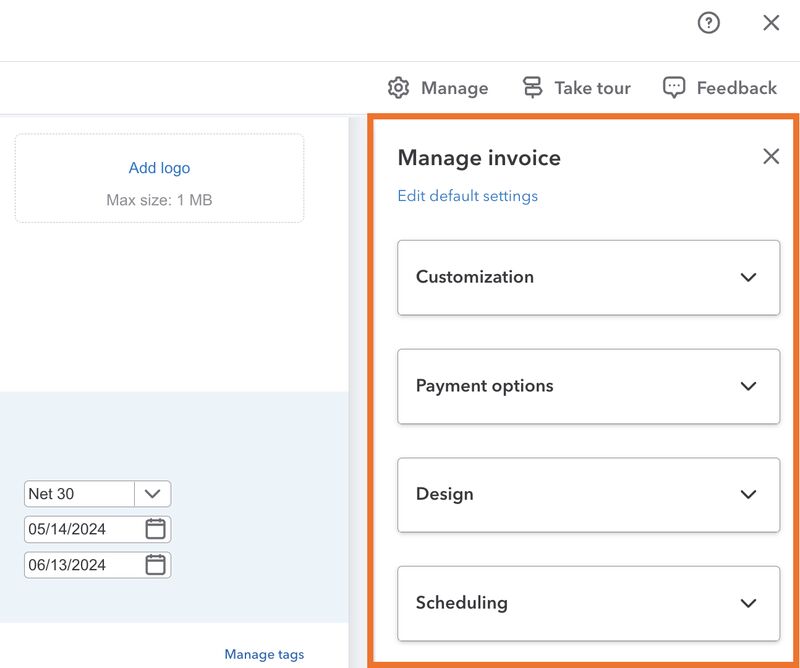
You can personalize your invoice further by clicking on the Manage button located at the upper right corner of the invoicing form, as shown below.
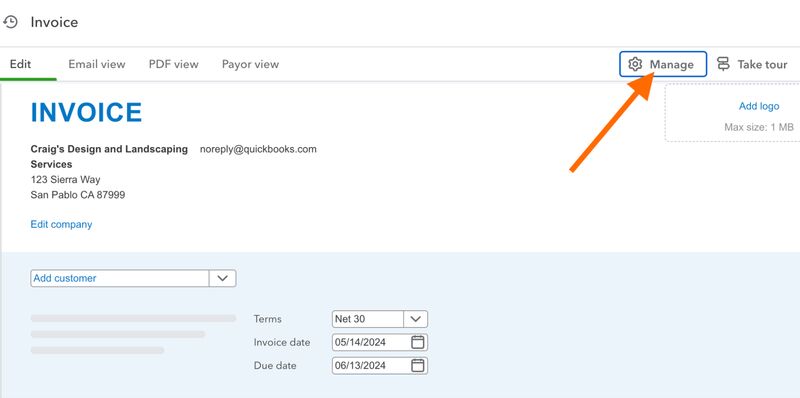
Click “Manage” to access additional invoice customization options
QuickBooks Online will then display a sidebar on the right that shows options for customizing invoices. You’ll see the following sections:
Additional invoice customizations in QuickBooks Online
CustomizationThis section allows you to select which fields to include in your invoice. Simply toggle on the field you want to include and toggle off the ones you want to exclude. If needed, you can also add custom fields by clicking on the Manage option next to “Custom fields” at the bottom of the popup window. For instance, if you are a law firm, you can add a custom field for “Case number.”
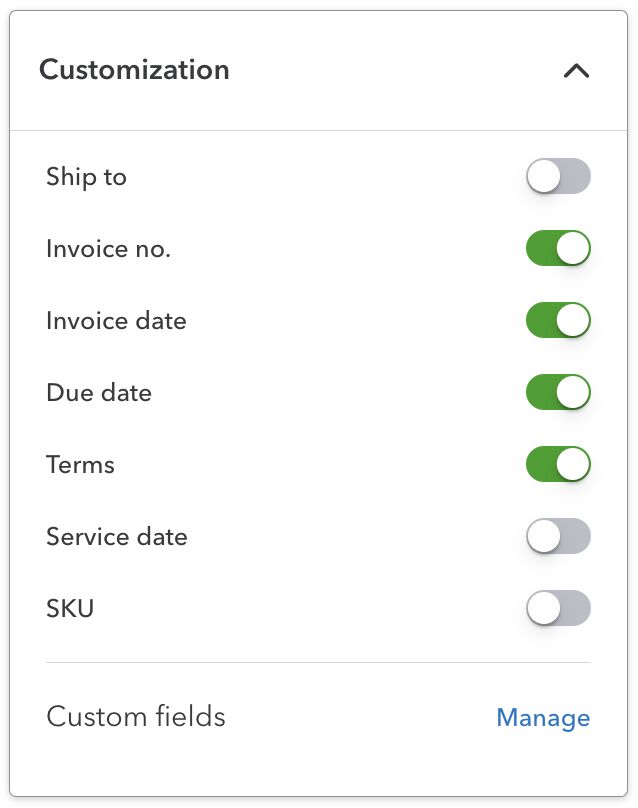
Customizing custom fields in a QuickBooks Online invoice
Payment optionsThis is where you can specify how your customers can pay the invoice (e.g., bank transfers and credit card payments). Additionally, you can opt to include deposits, discounts, and shipping fees in your invoice. You can also set up multicurrency if needed.
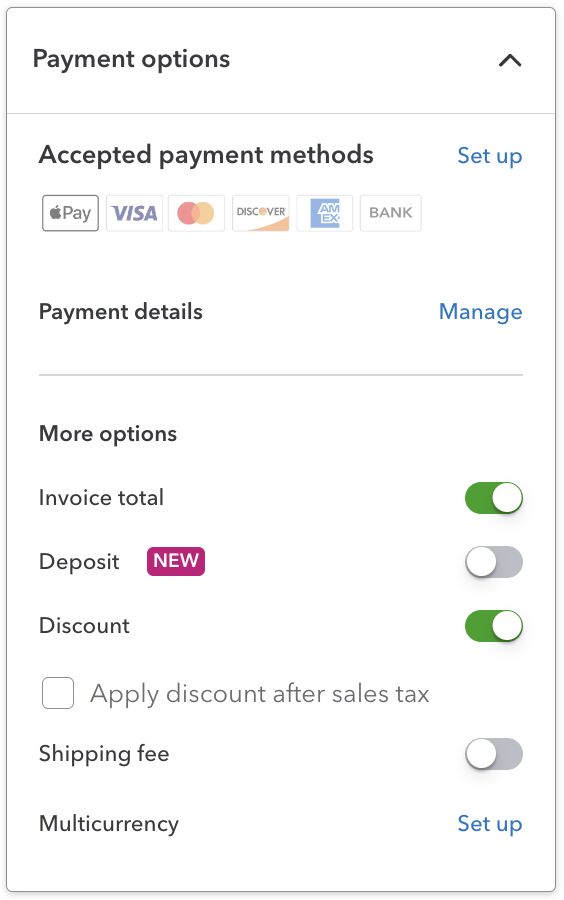
Setting up payment options to apply to a QuickBooks Online invoice
In this section, you can select from several invoice templates (e.g., modern and standard). You can also change the invoice color by selecting from the available colors.
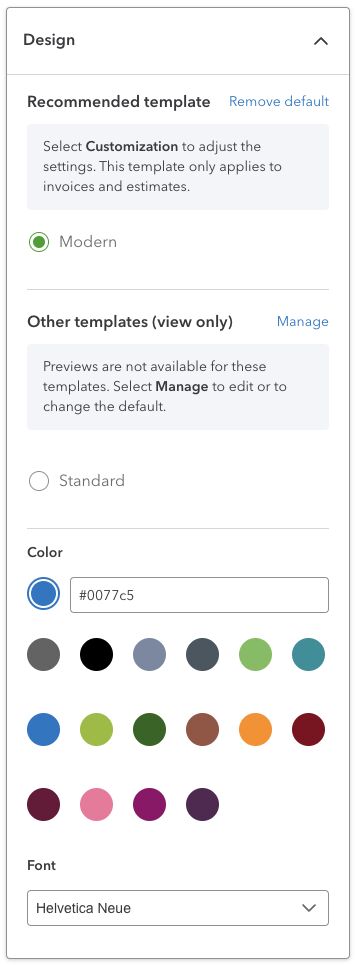
Changing the invoice color in QuickBooks Online
Custom colors: You aren’t limited to the 16 predefined colors. The text box beside your color selection is an HTML color code, which lets you input any color. If you want to apply a different color, you can use a website that provides HTML color codes.
Additionally, the Design section allows you to create invoice templates so that you can quickly generate invoices without manually entering the same information every time you create an invoice. You just need to select the invoice template, add specific transaction details, and then send it to your customer.
To create a new template, select the green Manage button under the Design section and you’ll be taken to the Custom form styles screen. From here, click the small arrow next to New style and then select Invoice, as shown below.
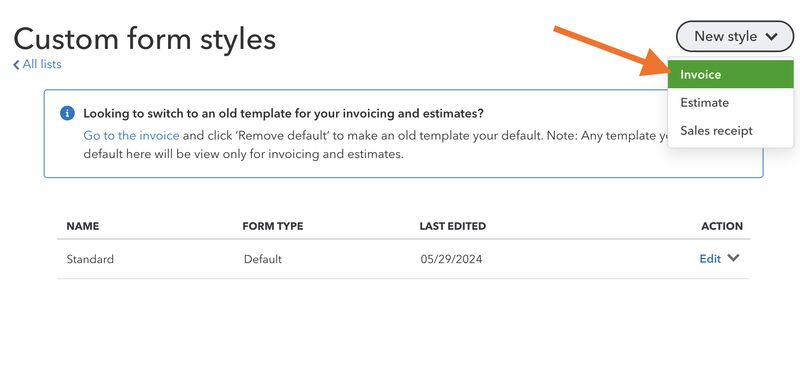
Select “Invoice” under “ New style” to create a new invoice template
From here, you can proceed to modify three aspects of the invoice:
- Design: Where you customize the overall design of your invoice template
- Content: Where you can edit the content of your invoice, including business name, contact details, and address, as well as add custom fields if needed
- Emails: Lets you edit the content of your invoice email, including a personalized message to your customer
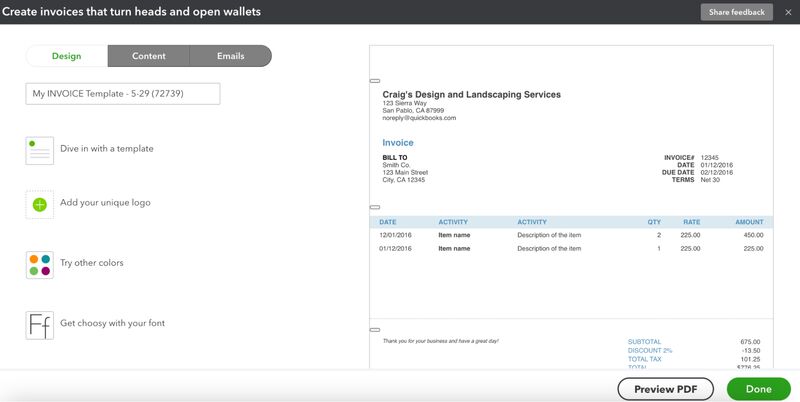
Customizing a new invoice template in QuickBooks Online
Once done, click the Done button, and then the template will appear in the invoice template list. The next time you create an invoice, you just need to select the template under the Design section.
Select an invoice template from the Design section
SchedulingHere, you can schedule your invoice to be sent at a predetermined time, which is called a recurring invoice. You can also set the invoice to print later and enable automatic invoice reminders.
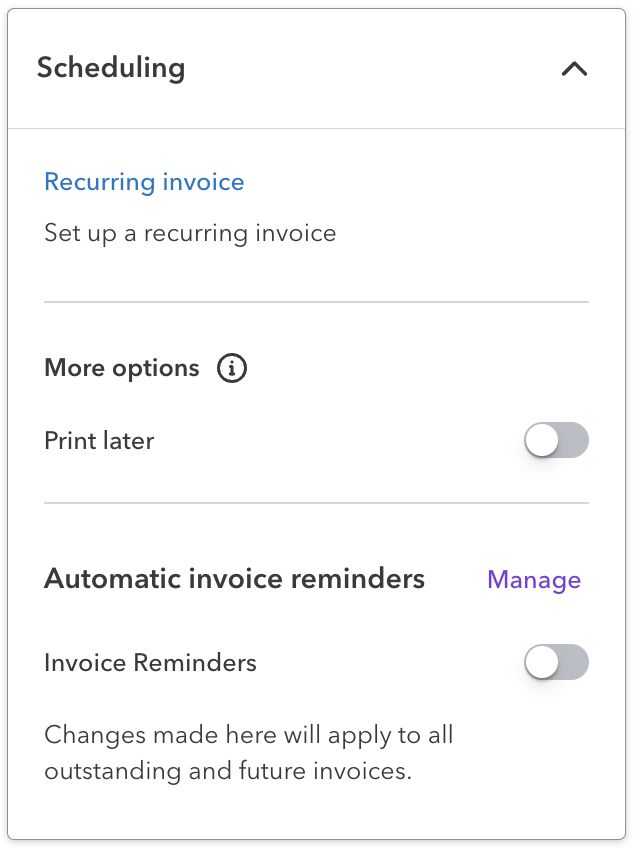
Scheduling invoices in QuickBooks Online
Step 4: Check Your Invoice in Different Views
You can see what your invoice will look like in three different views by clicking on the respective view next to Edit at the top of the invoicing form.
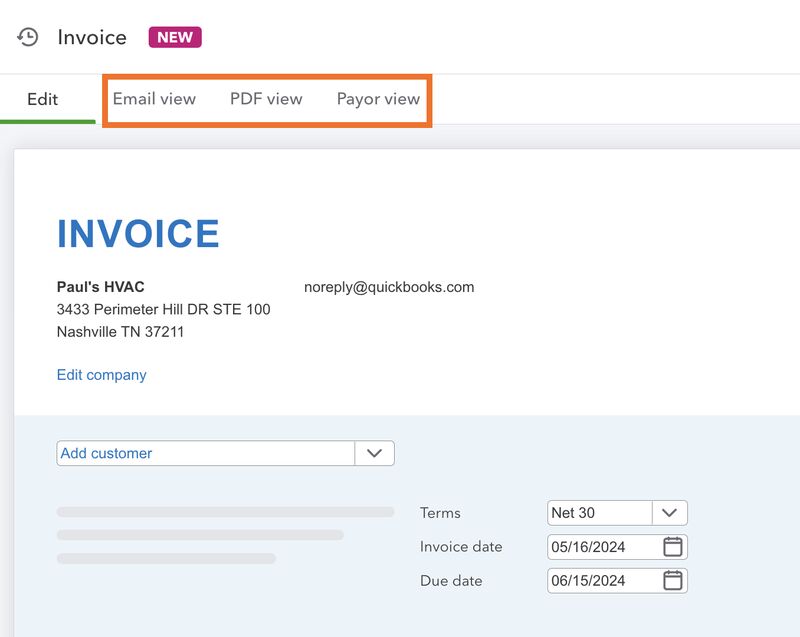
See your invoice in three different views
- Email view: This is how your customer views your invoice when they receive it as an email.
- PDF view: This is what your invoice looks like when you save or download it or email it as a PDF to your customer.
- Payor view: This is what your invoice looks like when your customer or someone from their accounts payable (A/P) team is about to pay the invoice.
Here’s what your invoice will look like in those three different views:
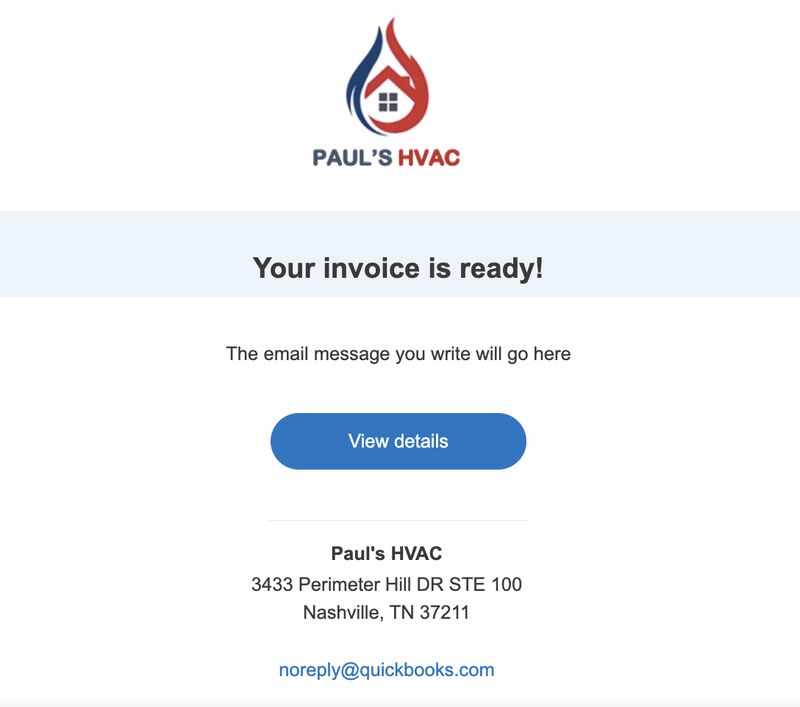
Sample email view of an invoice in QuickBooks Online
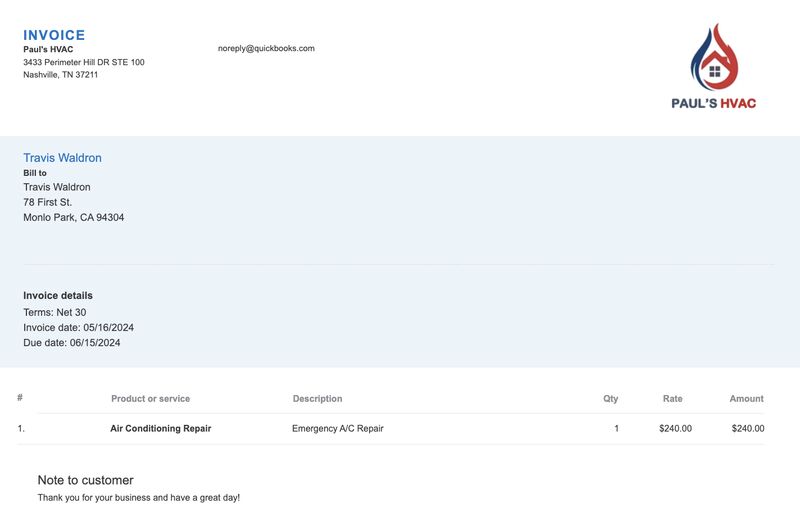
Sample PDF view of an invoice in QuickBooks Online
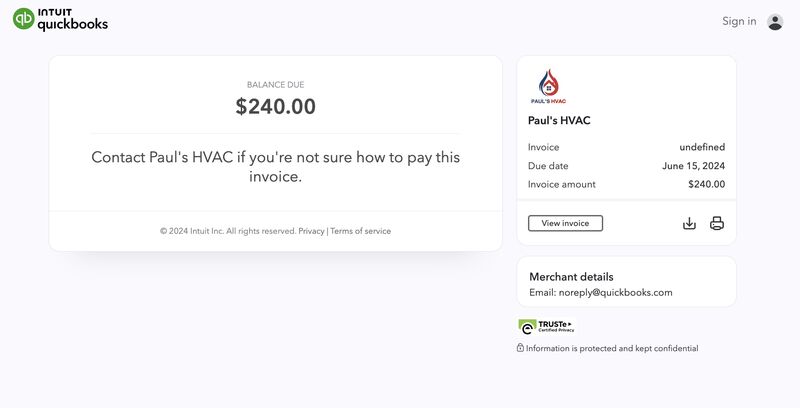 Sample payor view of an invoice created in QuickBooks Online" width="800" height="408" />
Sample payor view of an invoice in QuickBooks Online
Step 5: Personalize Your Email Content
The process for customizing the email content is done separately, which is illustrated in our tutorial on setting up sales form content in QuickBooks Online. However, you can control what to include in the email when you send the invoice right away.
To do this, click Review and send at the bottom of the form (shown in the screenshot under Step 6). An email template will appear, and you can edit the content, including the subject line.
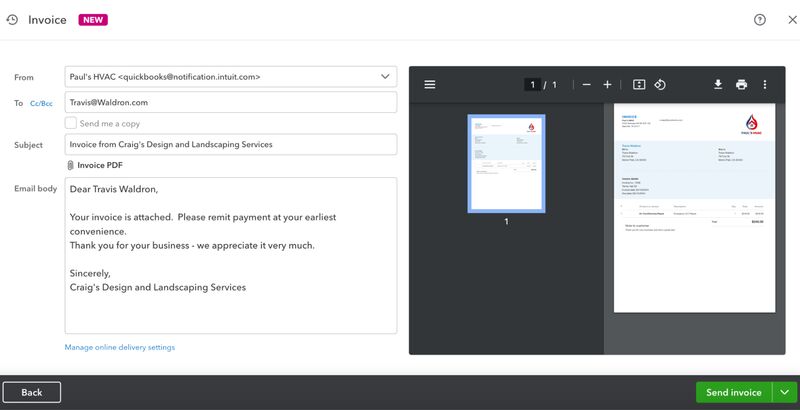
Customizing invoice email content in QuickBooks Online
Step 6: Send Your Invoice or Save It as a Draft
As mentioned, if you’re ready to email your invoice, click on the green Review and send button, review the email template, and then click the Send invoice button (shown in the image above). If you want to save it as a draft, click the Save button at the bottom of the form instead, as shown below. You can also print and export it by clicking on Print and download.
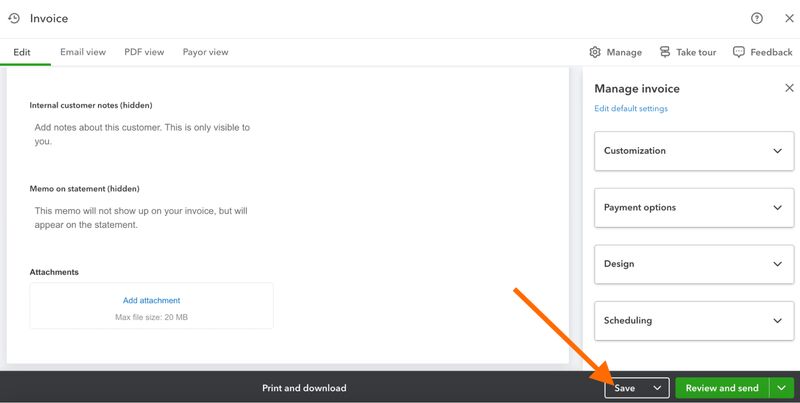
Click “Save” to save your invoice as a draft
The Importance of Customizing Invoices
As our best small business accounting software and top-recommended invoicing software, QuickBooks Online stands out with its professional-looking invoices. We highly recommend customizing your invoices to
- build brand awareness
- enhance your brand
- improve business communication
- increase sales in different ways
For example, customizing the design of your invoice makes it look more professional and attractive. This may encourage your customers to pay faster and consider doing more transactions with you.
Frequently Asked Questions (FAQs)
How do I customize an invoice in QuickBooks Online?You can customize an invoice by uploading your company logo and adjusting invoice colors and fonts, adding fields unique to your business, and including a personalized message for your customers. You can do these from the new invoicing form, which allows you to create and customize your invoices on the spot.
Can I create invoice templates using the new invoicing layout Online?Yes, and you can do so by selecting Manage under the Design section of the invoicing form and then customizing the new invoice template.
Is the new QuickBooks invoicing layout available to all new users?Some QuickBooks Online users may still be using the old layout, but there should be an option to switch to the new one. All users will eventually have the new layout; the old one will no longer be available over the coming months.
Wrap Up
You just learned how to customize invoices in QuickBooks Online. Our next tutorial is about how to set up sales form content in QuickBooks Online, where you’ll learn how to designate what content will show on your invoices, estimates, and sales receipts.
About the Author
Mark Calatrava
Mark Calatrava is an accounting expert for Fit Small Business. He has covered more than 50 accounting software for small businesses and niche industries and has developed an in-depth knowledge of the important features of accounting software, including how the importance of these features vary by business. As a QuickBooks ProAdvisor, Mark has extensive knowledge of QuickBooks products, allowing him to create valuable content that educates businesses on maximizing the benefits of the software.